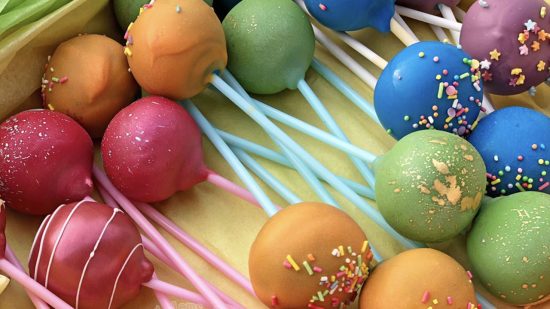
Welcome back to our blog! This month, we’re walking you through the easiest way of making cake pops! Throughout this post, you’ll pick up tips to show you that making them can be an absolute breeze 🙂
To make these (approx 9) cake pops, you’ll need:
– 200g cake (equivalent to roughly 6 cupcakes)
– 80g buttercream (basic recipe 250g butter, 500g icing sugar)
– 400g candy melts
– Cake pop sticks
– Chocolate melting pot
– Pearl dust colours
– Dusting brush
– Chocolate colourings
– Edible glue
– Small paintbrush
– Sprinkles
– Cake dummy/ cake pop stand
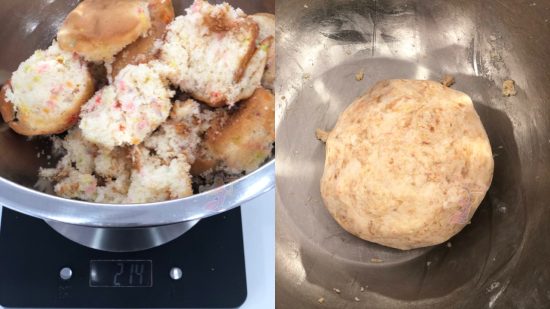
Place roughly 200g of cake into a bowl and break it up until it resembles breadcrumbs. We used our yummy Madeira Cake mix for this which works out to roughly 6 cupcakes (doesn’t matter if you’re a little over). Add approximately 80g of buttercream into the bowl and mix through until it forms a dough consistency. You’ll know you’ve added enough when the mix doesn’t crumble and fall apart in your hands when you squeeze it. The amount of buttercream you need to add will massively depend on your cake – for example, chocolate cakes tend to be more moist and so may not need as much buttercream to hold its shape!
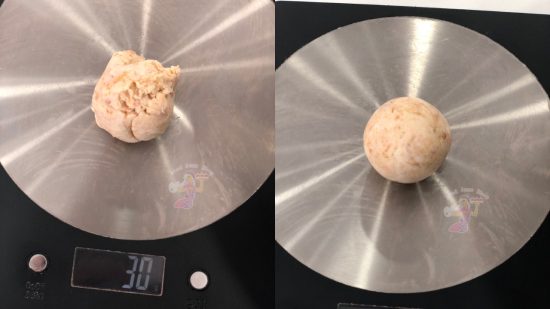
Break your mix into 25g-30g chunks and roll them into balls using the palms of your hands – they should be nice and compact as shown above. It’s really important to not go much heavier than this as otherwise your cake pops have a tendency to slide down the stick or fall into the candy melts as you dunk them.
You don’t have to stick to just this shape, you can also shape them into stars, squares, clouds etc by hand or by using our chocolate moulds which come in a variety of cute shapes 🙂
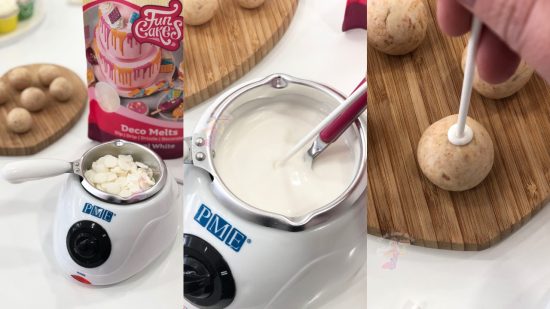
We always use these little chocolate melting pots as they’re fab at controlling the temperature of candy melts/ chocolate! Pour in your candy melts and stir regularly until melted through; this is the point at which you could add some chocolate colouring (ours are cocoa butter based so they won’t seize when you add them in).
Dip a few cm of your cake pop sticks into the chocolate and then immediately push it halfway into your cake pop ball. I would recommend holding your cake pop as you do this to avoid flattening one side of your shape. Repeat this for all of them and then place them in the fridge to chill for about 10 minutes.
If you’re finding that your chocolate or melts are runny enough, simply add 1tbsp of sunflower/vegetable oil and mix thoroughly until smooth!
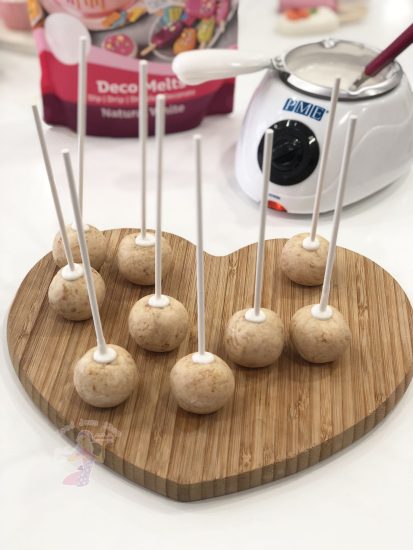
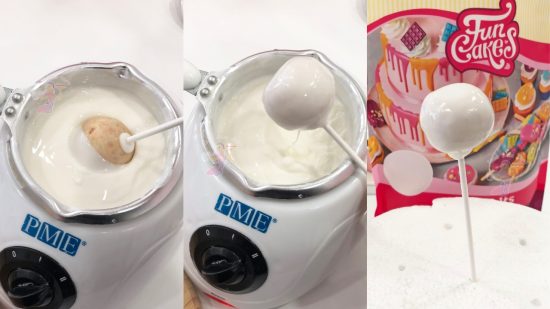
Once the cake pops have chilled, you can dunk them! Carefully place them into the chocolate pot until fully submerged and then remove them. Tap them gently against the side of the pot to get rid of any excess, turning them slowly as you do so. Prop it up in a cake pop stand or a polystyrene dummy until they’re fully set.
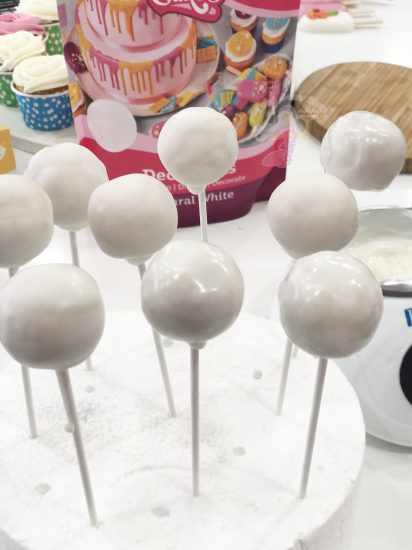
You’ll notice they’re starting to set when they start to lose their shine (but don’t worry, we can make them look super pretty!) 😛
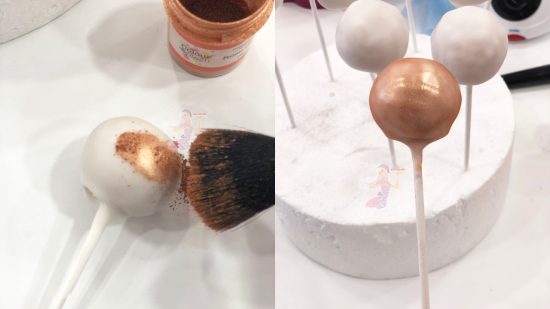
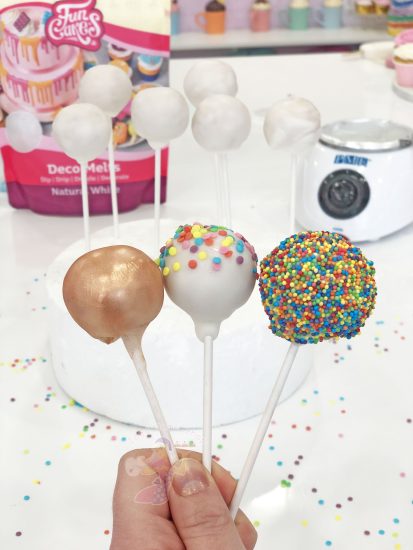
We have a broad range of gorgeous pearl dust colours which are all 100% edible and are great for bringing back some shine to your treats! Simply dip your dusting brush into your pot of dust and brush it straight onto your cake pop. Buff it on in a circular motion for an even coating and voila!
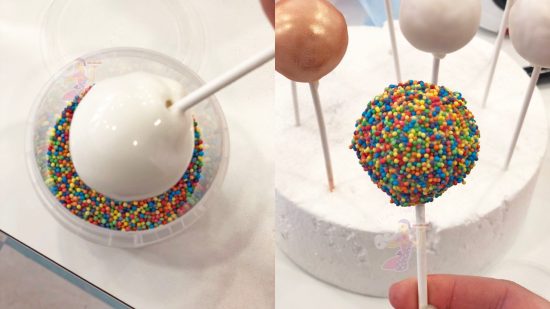
Another way of decorating these is to cover them with sprinkles (the brighter and more colourful, the better!). We have lots of pretty mixes as well as 100s and 1000s which all work so well 🙂
To get a full coverage, you need to dunk your pop into the chocolate, tap off the excess and once it’s stopped dripping, you can place your cake pop pop straight into a pot of sprinkles and rotate it until fully coated.
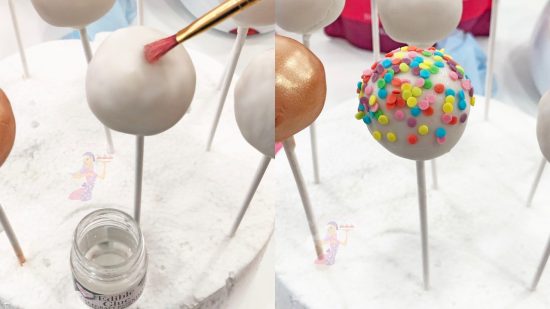
For more strategic placing of sprinkles, allow your cake pop to set fully and then you can paint the designated areas with a thin layer of edible glue. Place your sprinkles on top and let them dry out!
Once they’re set, you can lay them down in a box or package them into clear cello bags for gifts (if they can last that long!). It’s time to tuck in and enjoy 😀

Cake Pops
Equipment
- 9 Cake Pop Sicks
- 1 Electric Melting Pot
- 1 Cake Dummy (for standing up cake pops)
- 2-3 Paintbrushes
Ingredients
- 200 grams Cake (any flavour)
- 80 grams Buttercream
- 400 grams Deco Melts You won't use all of these, it just helps to have extra to dip into
- 20 grams Sprinkles
- 1 gram Edible Lustre Dust
Instructions
- Break your cake up into crumbs in a large bowl
- Add the 80g of Buttercream and mix thoroughly until you have a thick dough that looks a little like cookie dough
- Break into 25-30g chunks, then roll into balls
- Melt your Candy Melts in an electric melting pot or over a bain amrie
- Dip a cake pop stick into the candy melts, then push into the cake pop bal approx 1cm deep
- Repeat until all cake pops are dipped, then place on a flat tray and chill in the fridge for approx 10 mins
- Once chilled, take a cake pop and dip it into your candy melts, turning regularly and tapping on the edge of the melting pot to shake off any excess
- Push the stick into the cake dummy and allow to set. repeat until all cake pops are dipped
- For Sprinkle dipped cake pops, dip the cake pop into a pot of sprinkles before the candy melts are set
- For the lustre dusted cake pops, used dry dust and a large soft paintbrush to coa the cake pop in a gorgeous metallic colour
We really hope you enjoyed this blog post and have picked up some handy tips! We absolutely love to see your creations so if you post on social media, be sure to tag us or use the #icedjems hashtag so we can see!