These Mermaid Meringues are super easy and super cute! Great as party favours, a simple dessert or to spice up your party table.
The ingredients are super simple, these meringues are gluten free and if you use a dairy free butter in your butter (like Stork Blocks in the Foil) you have a great gluten free and dairy free treat for any guest with intolerances. If you want a flavour then add it to your buttercream, as any flavour added to the meringues before baking will most likely disappear once baked.
This recipe makes approx 20 meringues (40 individual shells sandwiched together).
You will need:
Method:
Preheat your oven to 100 degrees for fan assisted ovens, I find cooking meringues and other similar bakes like macarons troublesome in non fan ovens due to the lack of air circulation. You can wedge a wooden spoon on the door of the oven for non fan ovens to help with air circulation. Make sure you are using an internal oven thermometer, as temperature is key for meringues as you want to dry them out slowly, not burn them. The temperature on your oven dial will usually be wrong and can often be out by as much as 30 degrees.
Place 100g of Egg Whites into a large stand mixer bowl and mix on a medium speed using the whisk attachment until you have a foamy white mixture that stands in stiff peaks.
Continue mixing the egg whites and add 1 tablespoon of the icing sugar to the bowl at the time. Let the icing sugar mix in before you add the next spoonful, your meringue mixture should become glossy and thick.
Continue mixing for a few minutes after the last of the icing sugar has been added, you should have a thick and sturdy meringue mixture. To test if the meringue is ready, remove the bowl from the stand and turn it upside down. If the meringue doesn’t move or fall out of the bowl it is ready.
Spoon half of the mixture into another large bowl, then colour the meringue mixtures in your chosen colours. I used Sugarflair Pastes as these are less liquid than any other colour on the market so won’t make your meringue mixture split or become sloppy.
Once your colour has been mixed, spoon the meringue mixture into two large disposable piping bags.
I find silicone baking mats the best non stick way to bake meringues and macarons. Place a Shell Template underneath the mat to use a guide for piping (you can download the templates I created for free with any purchase of our Silicone Baking Mats).
Snip a very small end off your piping bag and pipe onto the mat following the template, I find starting from the outside of the shell is easiest, working my way into the middle.
Once your mat is piped, you can bake! Make sure your oven temperature is spot on and place the mat in the middle of the oven for approx 35 minutes. DO NOT OPEN YOUR OVEN! Sorry to go all caps lock on you but this is important! 🙂 If you open your oven during baking and the meringues will crack, and no one likes cracked meringues! So hold out until they’ve baked (unless you see them burning, in which case your oven temp may be to high). Once baked, remove from the oven and allow to cool on the mat.
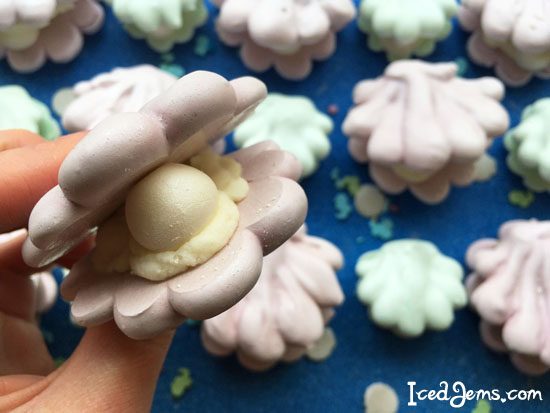
To make your pearls, roll a small ball of fondant (about 1cm in diameter) and brush it gently with the pearl lustre dust.
Once cooled, the meringues should fall right off the mat. Place them out with half of the shells upside down so you can pipe onto them. Pipe small amount of buttercream in the middle of the shells, being careful not to go too close to the edge. Push a fondant pearl into the buttercream then push another shell on top so they are sandwiched together with the buttercream.
I finished the tops of my meringues off but brushing them with a little of the pearl cut for an extra sparkle.
Now simply serve and enjoy! Eat within a week.
Jem x
 These Mermaid Meringues are super easy and super cute! Great as party favours, a simple dessert or to spice up your party table.
The ingredients are super simple, these meringues are gluten free and if you use a dairy free butter in your butter (like Stork Blocks in the Foil) you have a great gluten free and dairy free treat for any guest with intolerances. If you want a flavour then add it to your buttercream, as any flavour added to the meringues before baking will most likely disappear once baked.
This recipe makes approx 20 meringues (40 individual shells sandwiched together).
You will need:
These Mermaid Meringues are super easy and super cute! Great as party favours, a simple dessert or to spice up your party table.
The ingredients are super simple, these meringues are gluten free and if you use a dairy free butter in your butter (like Stork Blocks in the Foil) you have a great gluten free and dairy free treat for any guest with intolerances. If you want a flavour then add it to your buttercream, as any flavour added to the meringues before baking will most likely disappear once baked.
This recipe makes approx 20 meringues (40 individual shells sandwiched together).
You will need: