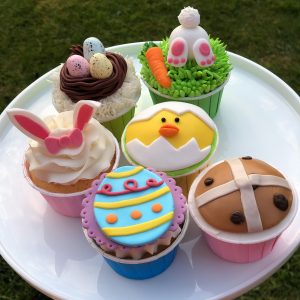
We know that lockdown is a tough time for everyone at the moment, particularly the children! If you’re stuck for ideas at what you can do with your little ones this Easter, take a look at the cute little tutorials below 🙂 We’ve packed this blog with easy to follow instructions so you can get started right away.
The main list of equipment you’ll need is:
- Fondant – White, Pink, Orange, Yellow, Brown & other colours of your choice
- Piping bags
- Grass Tip
- 2D Tip
- A batch of buttercream, 250g butter and 500g icing sugar + flavouring of your choice
- Round cutters
- Cupcake domes
- A sharp knife
- A paintbrush
- Edible glue
- Paste colours – we use Sugarflair at the shop!
Easter Chick
Start by rolling out some yellow fondant to about 3mm thickness and cut out a circle using a 7cm round cutter. Set this to one side and repeat the process for white fondant. Cut your white fondant into thirds using zigzags to resemble a cracked shell – if you’re using one of our sugarcraft mats, be sure to use a light pressure with your knife so you don’t damage it. Stick them onto the yellow piece of fondant using a little bit of edible glue!
*Top tip: lift your fondant every few rolls to help with air circulation which will prevent it from sticking to your mat.
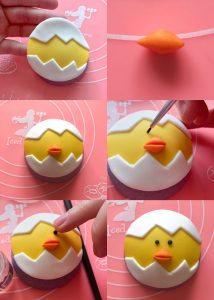
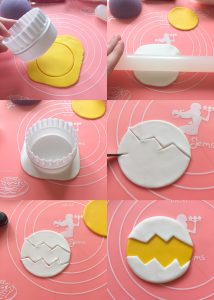 Carefully place the topper over a cupcake dome and start work on the beak! To make the beak, form a diamond shape (about 1cm width) using some orange fondant, cut a horizontal slit for the mouth and stick it down onto the centre of the topper. Apply a small dab of edible glue for the eyes and stick down some black sprinkles/small balls of black fondant.
Hot Cross Bun
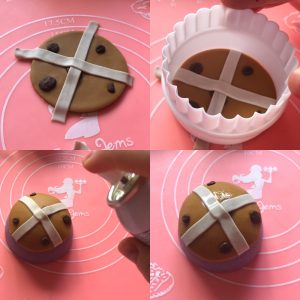
Knead some teddy bear coloured fondant and roll it out to about 4mm thickness, then cut out a circle using a 7cm round cutter. For the raisins, roll up some small balls of brown fondant, place them randomly onto your base and use a knife to add some texture to your “fruit”! Mix together some white and brown fondant to make the “paste” (about 1:4 brown to white should give you a nice shade). Roll it out to about 2mm thickness and so that it’s slightly larger than the diameter of your base and cut out 2 x 5mm strips. 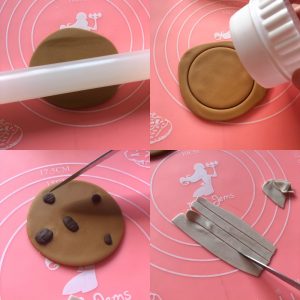 Paint a small amount of edible glue in the shape of a cross and lay the strips down. For a tidy finish, use the 7cm cutter again to snip off the excess fondant! Pop your topper onto a foam cupcake dome and leave the set for a few hours. If you want to create that yummy glazed look for the hot cross buns, spray lightly with some edible glaze spray – if you’re doing multiple layers, wait until the previous layer has completely set before applying again!
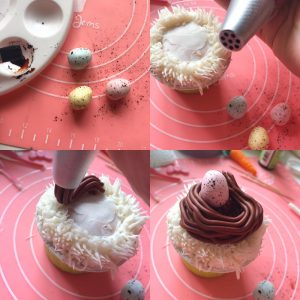
Speckled Eggs Nest
Now these are ideal if you haven’t managed to get a hold of any mini eggs but love the look of them 🙂
Start by picking out 3 same-sized pieces of fondant and tinting them with some paste colours, being careful to only add a teeeeeny amount as they’re super concentrated and we want pastel colours for this design! To form the egg shape, apply pressure to just half of the ball using your finger and slowly roll it back and forth until it tapers off slightly.
For the speckled effect, pop some brown paste colour into a paint palette and mix with some rejuvenator spirit to create a paint (if you’re looking for an alcohol free option, water will work for this but just be mindful that it will take a lot longer for the paint to dry). Load a soft paintbrush with the paint and gently pull back on the bristles and release! For fainter specks, flick from further away and for larger specks, go closer to the eggs – I personally love doing a mixture of both! To create the nest, fit a piping bag with a grass/hair piping tip and fill with some uncoloured buttercream. It’s essential to cover the exposed cupcake with a thin layer of buttercream so that the grass has something to stick to! Pipe around the outside of the cupcake, squeezing the bag and when the strands are long enough, stop the pressure and pull the tip away.
For the nest itself, use the same tip again but this time, fill your bag with brown tinted/chocolate buttercream. Simply pipe in a circular motion, leaving enough room for the eggs to sit in the centre of the cupcake.
Bunny Butt
No matter how many times I see these on cupcakes, they always make me smile so we thought it was very necessary to include this in the tutorial!
Knead 20g of white fondant for the main body of the bunny and set aside – grab another 5g for the tail. You can either roll this in desiccated coconut or sanding sugar etc but if you don’t have any of these, you can just use a scriber tool or cocktail stick to gently scratch the tail and create some texture! Take another 5g of white fondant and split it in two for the feet. Roll these out so they’re tapered and then flatted using your finger. Roll some pink fondant into small balls for the paws and press into the fondant as seen below!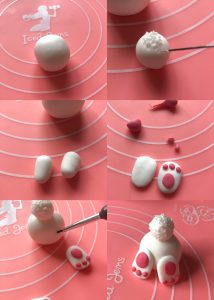 Tint some green buttercream using sugarflair pastes – to achieve this colour, I used equal amounts of party green and lime green. Using the same method as above, pipe some grass all over your cupcake (the wilder the grass, the prettier it looks in my opinion!). Once you’re happy with your grass, pop your bunny on top along with any other decorations you may have; little flowers or carrots go well with this 🙂
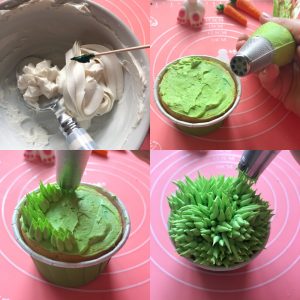
Bunny Ears
We used our bunny ears & bow mould for this particular cupcake as it’s just super cute and easy to create uniform ears every time! Spray the mould with some cake release at about an arms length away. Fill the middle part of the ear with some pink modelling paste* and then fill the remainder of the mould with white modelling paste until it’s flush. Flip the mould over and gently peel back to reveal your bunny ears and bow! You can leave the ears to dry flat or if you want them to have a bit more shape, roll up some kitchen roll and lay the ears on top.
*I used modelling paste for this as I wanted to ears to dry quickly! If you’d like to use fondant, just leave it to set over night 🙂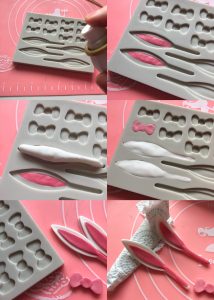 For the gorgeous buttercream ruffle effect, I used a 2D piping tip (you can also achieve a lovely effect with a 1M piping tip). To pipe a swirl start from the edge of the cupcake and pipe in a circular motion. Once you’ve reached your starting point, lift the nozzle slightly and pipe in a tighter rotation. Continue doing this until you get the height you want, create a centre point and then stop piping! Once the bunny ears are completely set, pop these directly into your cupcake and position the bow between them 🙂
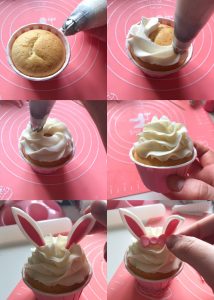
Easter Egg
You can get really creative with this one, using all sorts of colours and patterns! Roll out some coloured fondant to 4mm thickness and cut out an oval using an egg cookie cutter. To save myself from cutting this all out by hand, I rolled out some yellow sugarpaste and used a 9cm round cutter to cut out 3 thin strips. Attach these to your egg using a small dab of edible glue, spacing them evenly so that you have enough room for additional decoration. Roll up some small balls of fondant and press these into the egg, between the strips.
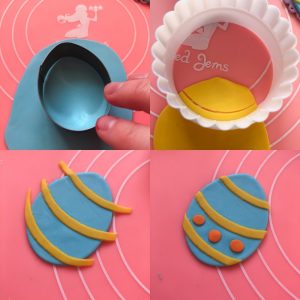 If you happen to have an extruder tool, I recommend using it for this part! If you don’t own one (or have misplaced it like me), rolling it out by hand is fairly straight forward. Take a thin sausage of fondant and thin it out by rolling it slowly using your fingers. Once it’s about the same thickness as uncooked spaghetti, you can start draping it over your egg to create little loops as seen below! Trim away any excess fondant, then create the base for your topper by cutting out a 7cm frilled piece of fondant and then lay your egg on top.
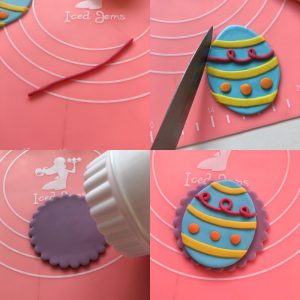
We really hope you enjoyed this tutorial and that you have a fun & safe Easter weekend 🙂
Jem x