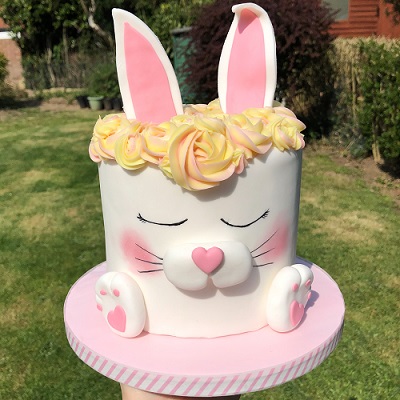
Happy Easter everyone! If you’re stuck on what to bake today, we have lots of yummy recipes throughout the blog as well as some tutorials for cakes you can make with kids at home 🙂
For this cake you’ll need:
- 800g white fondant
- Rolling mat
- Large rolling pin
- Sharp edge smoothers
- Dresden tool
- Veining tool
- 50g pink fondant
- Heart cutters
- Edible glue
- Fine paintbrush
- Black edible paint
- Dusting brush
- Pink lustre dust
- Cocktail sticks
- 2 x piping bags
- Sugarflair colours
- 1/2 batch of buttercream (125g butter, 250g icing sugar)
- 2D piping tip
- Small french piping tip
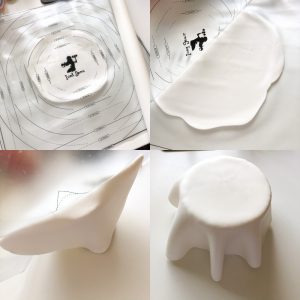 Roll out your white fondant (we always use Renshaw at Iced Jems) using one of our rolling mats, always starting from the centre and rolling out to the edge to ensure an even thickness of about 4mm. If you find your mat is sliding around on your surface, wet your worktop with a damp cloth (you don’t want pools of water!) and it should stay in place. For this cake I used a 6″ round by 5″ deep sponge so I rolled my fondant out until it reached the 11″ shown on the mat. Slowly peel back the top sheet and drape over your cake, holding your mat torte while you peel back the bottom sheet.
 Smooth out your fondant and then use a sharp knife or pizza wheel cutter to trim off the excess and create a clean, neat edge around the bottom of your cake. As you can see in the photo, I had all sorts of lumps and bumps in my icing but this is to be expected at this stage so don’t panic! Grab some sharp edge smoothers and rub in circular motions to smooth out any imperfections.
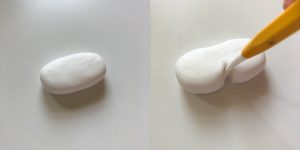 To create the nose, grab 30g of white fondant and roll into an oval shape and then flatten slightly. Use a veining tool to create an indent in the middle of the fondant.
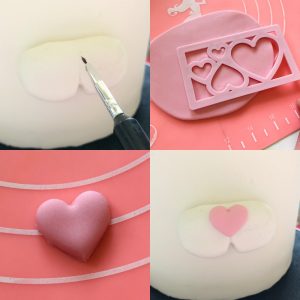 Dab on a little bit of edible glue to the back of the nose and press it into your fondant in the centre of the cake, holding it for a few seconds to make sure it’s in place. Roll out some pink fondant and cut out a heart using heart cutters – the size choice is completely up to you but i preferred the way the second smallest one in this set looked! Stick this straight onto the nose.
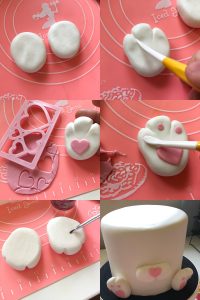
Now time for the adorable little feet! You’ll need another 30g of white fondant for each foot. Roll both of these into egg shapes and flatten slightly. Use your veining tool again to create the individual “toes” by marking them out into thirds.
Roll out some pink fondant to about 2mm, cut out 2 of the same sized hearts (I used the same size as I did for the nose) and stick these in the centre of the paw pad. Roll up 6 tiny pieces of pink fondant and secure them into the feet using a dresden tool. Apply a small amount of glue to the back of the feet and press them into the cake, either side of the nose.
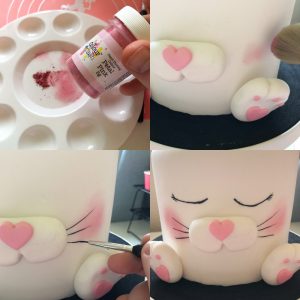 Now time to add in some detail to the face – I couldn’t resist adding some rosy cheeks to this bunny! I popped a small amount of petal pink lustre dust into a paint palette and lightly dipped my dusting brush into it. You want to be careful to not overload your brush for this as we want a soft, blended effect – if you’ve added too much, dab off the excess onto a piece of kitchen roll. Using very light strokes, brush the lustre dust onto the bunnys cheeks until they’re symmetrical on both sides.
Draw on some whiskers and eyelids using a fine paintbrush and edible black paint (and a steady hand!). If you don’t have any ready made paint to hand, you can mix up either some black dust or black food paste with a little rejuvenator spirit!
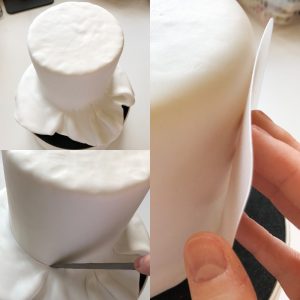
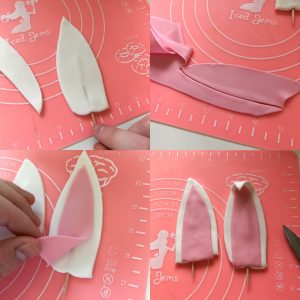 If you were looking at this picture and thinking ‘uh-oh, I don’t have any modelling paste for the ears!’ fear not, as I used the leftover white fondant I had from covering the cake 🙂 The trick for these is to allow them both time to set, and using supports like cocktail sticks. Roll out white fondant to about 3mm thickness, cut out 2 bunny ear shapes and push a cocktail stick through the centre of them for support – don’t worry if you can see the cocktail stick poking through at this stage! Roll out some pink fondant and cut out some smaller bunny ear shapes and then stick them down in the centre of your white fondant. You can leave them flat as they are or you can shape them slightly and support using a small piece of kitchen towel while they set for about 30 minutes.
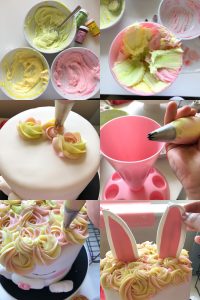 Tint some buttercream using sugarflair paste colours, I chose to create pastel shades using melon, lime green and pink. Fit a piping bag with a 2D piping tip and fill it with all 3 colours to create beautiful multicoloured swirls on top of your bunny. Fit a second bag with a small french piping tip and pipe more swirls to fill in any gaps.
Once the ears have firmed up, place them onto your cake and voila!
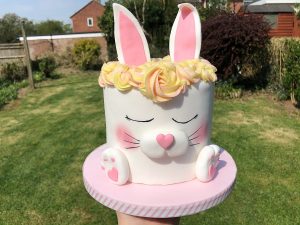
We really hope you enjoyed this little tutorial! Have a safe and happy Easter 🙂 x