Hey everyone! We’re really hoping to trigger some good weather with this watermelon cake step-by-step tutorial 😀
Everything we used can be found here!
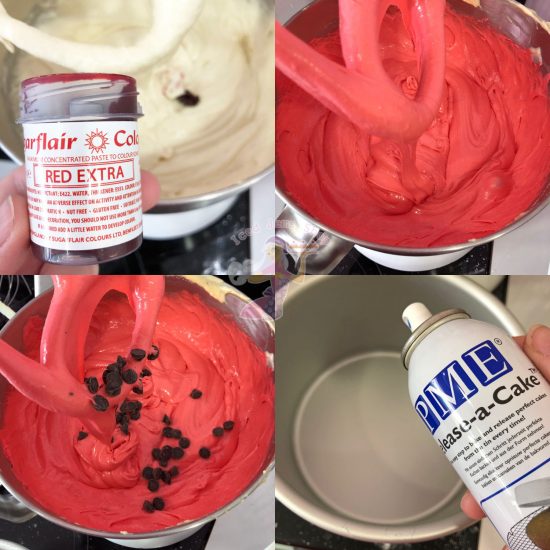
Start off by making your cake batter – I personally love using our Madeira cake mix as it’s fail proof and tastes delicious (you’ll need about 700g of mix). Once mixed together, add some Sugarflair Red Extra until you reach a dark pink colour in your batter. Remember that these colours develop in sponges so it will deepen and turn into a gorgeous bright red once baked!
For a fun little surprise when you cut into the cake, add 100g of dark chocolate chips to your batter to imitate the seeds you’d find in a watermelon.
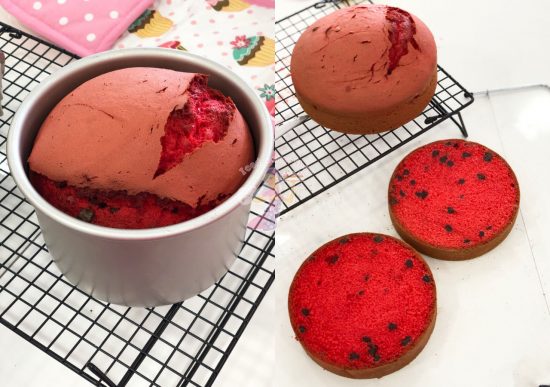
I used 2 x 6” tins (around 4” deep) for this cake and sprayed them with some cake release to ensure they don’t stick fill them evenly and bake for about 1hr 15mins on 140 Celsius. This is just a guide, you will know your own oven better so trust your judgment on this!
Once it’s baked, leave to cool in the tin for about 10 minutes and then turn out onto a cooling rack to cool completely. Don’t worry if your cake has a dome as mine did below, it’s actually very handy for the next part!
Once cooled, split your cakes into two layers using a cake leveller, trimming off any caramelisation from the top or bottom of the layers (leave the edges for now!) and do not discard your domed layer if you have one. You can see how bright the Sugarflair Red Extra turned out and how cute the chocolate chips look 🙂
Make some buttercream (I used 400g salted butter and 800g icing sugar, plus a little vanilla flavouring). Add Sugarflair Red Extra to the buttercream until it’s a dark pink colour and allow about 30 minutes for it to deepen and develop until you have a bright red buttercream. If after this time, it hasn’t turned bright enough for you, add a little extra food colouring and leave again.
When you’re happy with the colour, you can start filling and stacking all of your layers. Press down gently onto the top of your cake to squeeze excess buttercream out the side of your cake.
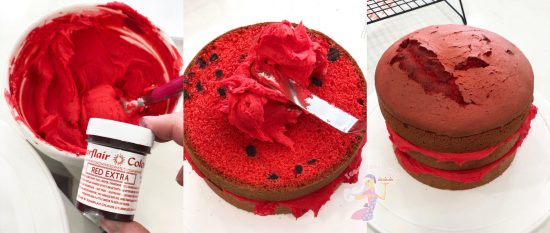
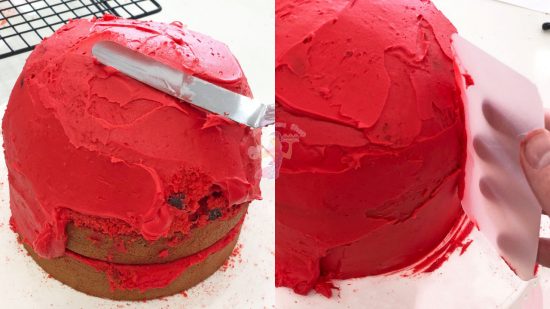
Grab a serrated knife and start carving your cake from top to bottom, removing any caramelisation around the edges and shaping the top cake to make it rounded. Patience is key at this point – you want to trim off small pieces at a time otherwise you may rip out chunks of cake. Do not drag your knife through the cake for this step, you’ll want to use gentle sawing motions.
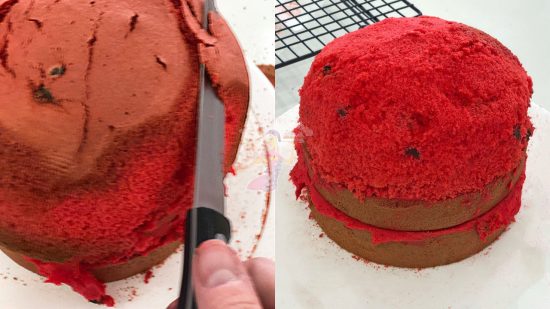
Carving cakes exposes lots of crumbs which can sometimes make it a little tricky to crumb coat. To counteract this, just add a tbsp of milk to your remaining buttercream to make it softer and easier to apply. Use a cranked palette knife to spread onto your cake – remember this doesn’t have to be perfect, we’re just trying to lock in the crumbs!
I used our super sharp edge smoothers to smooth out the buttercream for this cake as they’re flexible which means they can bend into the curves of watermelon which other smoothers couldn’t! Leave your cake into the fridge to chill for about 30 minutes or until your buttercream crusts over and is not greasy to the touch.
Measure the full diameter of your cake plus a few extra inches for peace of mind – this will let you know how far you need to roll your fondant! Next, dab a little piping gel onto your cake using a large soft paintbrush, particularly along the bottom of the cake to help the fondant to stick after your cake has chilled.
Grab 800g of fondant and knead until pliable. Wipe your surface down with a damp cloth and lay down the bottom sheet of your fondant rolling mats. Place your fondant down onto the centre of the mat followed by the top layer mat and start rolling out to the desired diameter using a large rolling pin. Tip: If you find it a little tricky to roll out, get started by rolling out without the top layer of the mat on and add it on later.
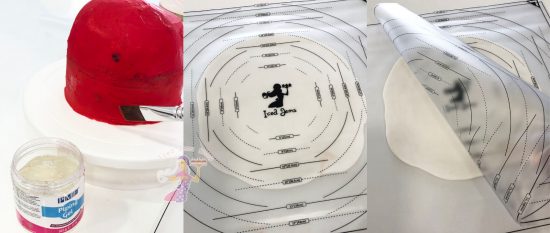
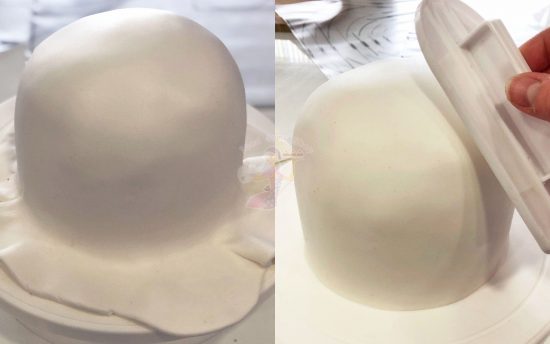
Once you’ve reached your desired size, peel off the top layer and position your fondant over your cake. Pull the bottom sheet of your mat torte and peel it back to reveal your lovely soft fondant! Smooth your fondant down onto your cake and trim away the excess. Grab a fondant smoother and begin to get rid of any creases or dents in your fondant using gentle circular motions.
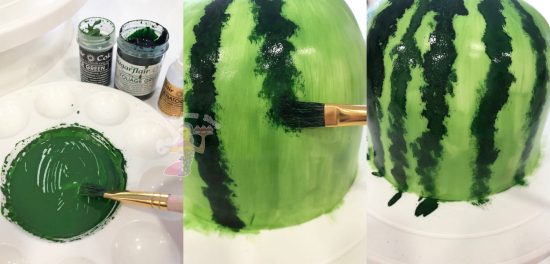
Time to paint! Using a large soft paintbrush, mix up some rejuvenator spirit with some Apple Green Sugarflair paste colour – you’ll need it to be a very thin consistency so that you don’t get full coverage on the cake as we want it to look a little patchy. Allow for this layer to dry fully, it shouldn’t be tacky to the touch!
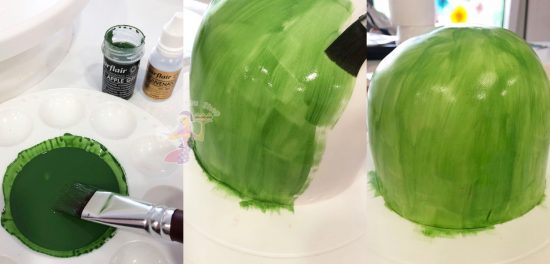
For the stripes, add a little amount of foliage green to your previous mix. This time, use a small soft paintbrush and dab lines onto your cake starting from the top and working your way down. Make sure that they’re not perfectly straight, or “clean lines” and are varying in thicknesses as they would on a real watermelon!
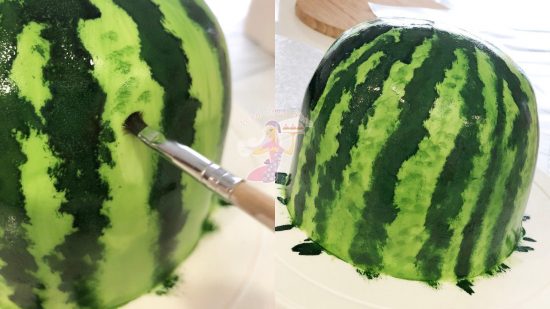
For the final step, take some more apple green into a separate paint palette and mix with rejuvenator spirit until a thin consistency and using a small paintbrush, very lightly dab the paint onto the lighter green parts of the fondant in no particular pattern, let your creativity flow! 🙂
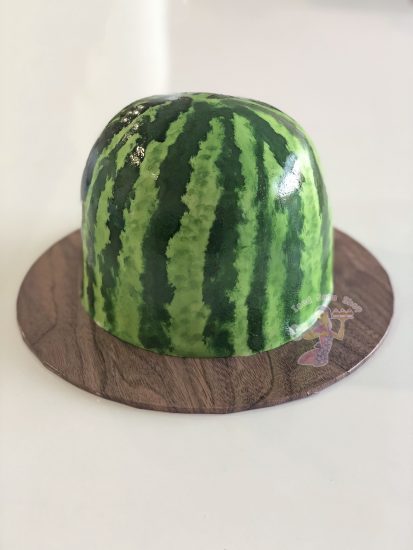
Place onto a wooden printed cake board and you’re good to go! 😀
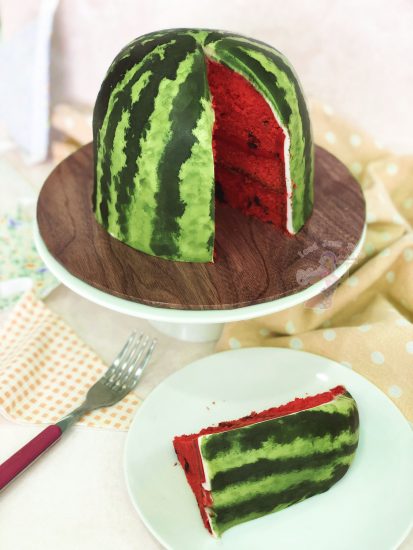
You will want to let this cake set for a few hours before cutting it (preferably overnight so the fondant has enough time to harden). Use a sharp knife to cut straight down the cake, wiping the knife between each cut so you don’t ruin the pattern!
We hope you enjoyed this tutorial, let us know what you think! 😀
Everything we used for this cute cake can be found in our shop!
Happy baking!