- Birthday Sprinkle Mix
- Happy Birthday Pattern Rolling Pin
- Shooting Start Topper
- Birthday Stamp Set
- Basic Shape Plunger Cutters
- Mini Cupcake Mould
- Candle Washi Tape
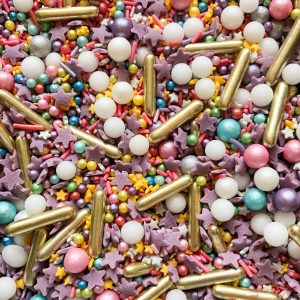 With a new month, comes a new sprinkle mix and I think this may be one of our best mixes to date – this photo really doesn’t do it justice. You’ll see these being used in the mini tutorial below and throughout the blog! 🙂
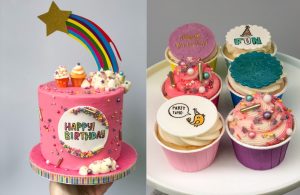
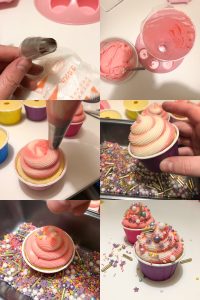 For some simple cupcakes, fit a piping bag with a medium french piping tip and fill with buttercream (for tips on how to achieve two tone buttercream, take a look at our rainbow box blog). Pipe a swirl on top of your cupcake, top with the sprinkle mix before your buttercream crusts over and voila!
 Next up is our new Happy Birthday pattern rolling pin! Personally, I think pattern rolling pins are an underrated decorating tool as they make such sweet cupcake/cookie toppers with minimal effort (and you guys go a bit crazy when we post videos of these on Instagram!). If you’ve never used them before, simply roll out your fondant with a regular rolling pin to about 4mm thickness and then roll over your fondant with the pattern pin in a single smooth motion. When you’re happy with your embossing, cut out a circle using a round cutter to match the size of your cupcake/cookie.
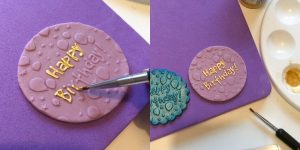 They’re pretty enough to leave as they are but if you fancied adding a bit more, you can paint the details using a mix of pearl lustre dust and rejuvenator spirit as seen above. Alternatively, brush your topper with dry pearl lustre dust to really bring it to life!
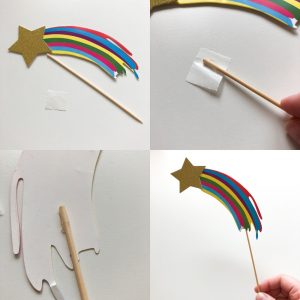 We’ve included a brand new cake topper in this box and just love it! 🙂 You’ll need to attach the cocktail stick at home so it can stand up but we’ve included everything you need to do this; just peel back the film to reveal the sticky tab, press your cocktail stick into it and gently pull it off the backing paper. Position your cocktail stick at the base of the topper and press down firmly to secure it then you can place it in your cake!
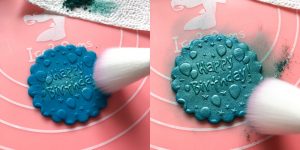
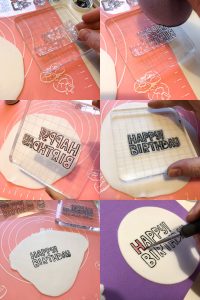 If you’ve been following us for a while, you’ll know that we’re a bit mad about embossing stamp sets! We’ve worked really hard to source them at a great price (sets start from £1.95) and they’re even reusable 😀
Start by rolling out your fondant to about 4mm, peel your stamp off the sheet and position it on your acrylic block. Mix a little sugarflair food colouring with some rejuvenator spirit and lightly dab this onto the stamp to ensure all of the detailing is covered. Flip your block over and press it gently into the fondant, then lift off to reveal your embossed details. Allow this to try for about 20 minutes before handling it or painting it.
If you’ve been following us for a while, you’ll know that we’re a bit mad about embossing stamp sets! We’ve worked really hard to source them at a great price (sets start from £1.95) and they’re even reusable 😀
Start by rolling out your fondant to about 4mm, peel your stamp off the sheet and position it on your acrylic block. Mix a little sugarflair food colouring with some rejuvenator spirit and lightly dab this onto the stamp to ensure all of the detailing is covered. Flip your block over and press it gently into the fondant, then lift off to reveal your embossed details. Allow this to try for about 20 minutes before handling it or painting it.
 I kind of went a little “extra” here and added some bling to this plaque! All you have to do is spread a little edible glue onto the edges of the plaque and place on the sprinkle mix – you may need to add some extra glue for the larger sprinkles to stay in place.
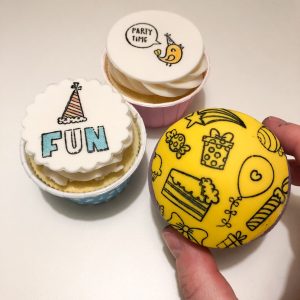
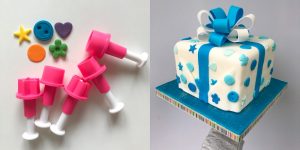 We’ve added a new basic shape plunger cutter set to our collection which includes; a star, a button, a heart, a circle and a blossom. They are perfect for cupcake toppers but as this is the birthday box, I thought I’d try using them on a bigger cake to create my own patterned “wrapping paper” for this gift box cake and I love the results 🙂
We love all things mini at this shop – mini measuring mugs, mini donut moulds, mini chocolate moulds etc so it only seemed fitting to source a mini cupcake mould and I am SO glad we did! Check out the tutorial below, showing you how to make little Iced Jems baking cups out of fondant!
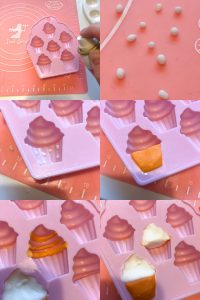 As always, we recommend you spray your sugarcraft moulds with a little cake release before filling with fondant at about an arms length apart. To create the polka dots, roll up tiny little balls of white fondant and place them at random into the “cupcake case” and then gently fill the rest of the casing with another colour of fondant. Fill the “frosting” section of the mould with a colour of your choice – you could do one block colour, marble your fondant or place in stripes of colour to create a two-tone buttercream effect.
 If you want to add sprinkles, paint on a small amount of edible glue and then carefully place the sprinkles on top (I used a pair of tweezers for this).
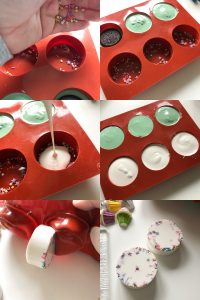 Our smaller chocolate covered oreo mould has been a huge hit at the shop as it requires a lot less chocolate and is a much better fit for regular sized oreos 🙂 Drop some of the sprinkle mix into the bottom of the mould, then cover with a layer of chocolate, place your oreo on top and continue to fill the rest of the mould until it’s flush. Transfer into the fridge to set and they should peel right out! Leave them as they are or you can top with some mini cupcakes
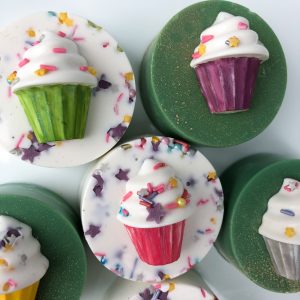
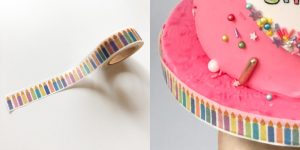
Thought I’d forgotten about the washi tape, didn’t you? Wrong! This month’s box brings in the long overdue candle design washi tape which looks fab around drums and treat box packaging. It’s self adhesive so doesn’t require the need for double sided sticky tape – the less faff, the better!
 I really hope you’ve enjoy this month’s #icedjemscakeclub box! If you’ve created anything using these goodies, make sure you tag us so we can see what you’ve made 🙂
Jem x