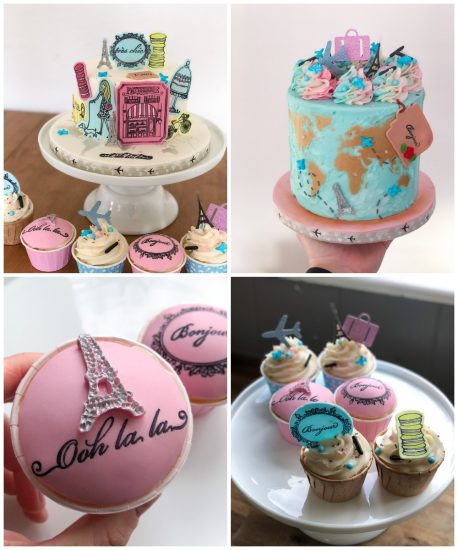
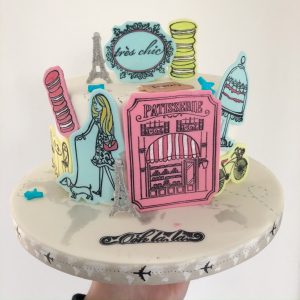
Our April Iced Jems Cake Club box is the Night in Paris which is packed with cute travel themed goodies! Each box will include:
- Night in Paris Sprinkle Mix
- Plane Washi Tape
- Eiffel Tower Mould
- Paris Cupcake Toppers
- Paris Embossing Stamp Set
- World Map Stencil
- Luggage Tag Cutters Set
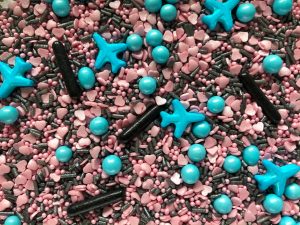 So as to not break tradition, we’re kicking off this month’s box with a gorgeous new sprinkle mix! Possibly one of our fanciest-feeling mixes today, it has cute little planes, chocoballs, rods and tiny hearts & strands. You’ll see them used throughout the blog 🙂
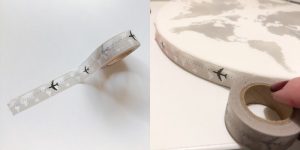 Absolutely smitten with the new washi tape! All of our washi tapes are self adhesive so will stick to your cake drums or treat boxes with little effort – so much easier than using ribbon and double-sided tape.
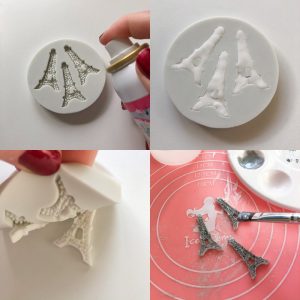 Above is a quick tutorial on how to use our sugarcraft moulds if you’re new to cake decorating…Spray your mould with a little cake release at about am arms length away (you only need a light coat and don’t want your spray to start pooling in the mould). Fill it with fondant or modelling paste until it’s flush with the mould and then flip the mould over and slowly peel it away to reveal your topper! Allow about 15 minutes for it to set and then you can paint it or dust it with lustre dust. I used our gun metal dust to achieve this colour 🙂
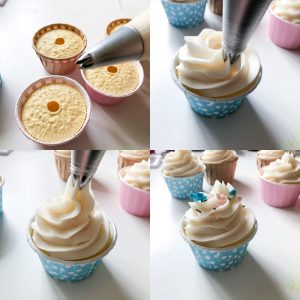 Couldn’t resist using our fab baking cups for this cupcake design – can you blame me though? I fitted a piping bag with one of our 1M tips and piped a quick Mr Whippy style swirl onto the cupcake and topped with the sprinkle mix. To finish them off, I pushed the glitter toppers straight into the buttercream which really adds that extra ‘wow’ factor with minimal effort!
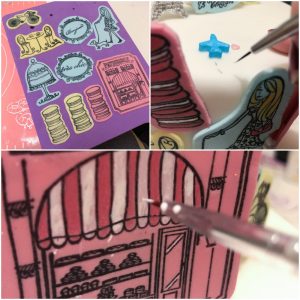
You all know that here at Iced Jems, we love our embossing stamps and will leap at any chance to expand our collection! Sub boxes seem the perfect excuse to start sourcing new designs and that’s exactly how we ended up with this gorgeous Paris themed stamp set. Here’s a little hack on how to use the stamps which perhaps may be a little trickier to paint or if you don’t have a steady hand!
 For this particular cake design, I wanted to make some plaques which would stand up by themselves so I opted for modelling/florist paste. If you want to use these for cupcake toppers or to stick straight onto the cake, you’re probably best using ordinary fondant.
- Roll out your florist paste until it’s very thin – you’ll know it’s thin enough when you hold it up to the light and can see your fingers through it.
- Choose a paste colour and mix it with a small amount of rejuvenator spirit – you don’t want it to be a liquid as such, but you need to “loosen” the paste.
- Slowly peel your stamp off the sheet and place it down onto an acrylic block.
- I strongly advise using small sponges for this part for much better control but as we’re currently on lockdown in the UK, I wasn’t able to grab my stash from the shop so I improvised with some cupcake domes! Dip your sponge into the colour and then gently dab onto the stencil until you can see all of the details have some paste on them.
- Turn your block over, press it into the florist paste and then gently lift to reveal your design!
 Wait about 15 minutes to guarantee that the colour is completely set before you paint in some details. For the shop window above, I used petal pink pearl dust and white white icing colour. As you can see in the picture below, adding in the odd splash of colour can be really effective without having to go through the effort of painting in every single detail.
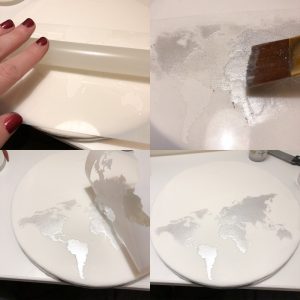 I’m sure you’ll understand the excitement at finding this world map stencil! I absolutely love the final effect and it’s so easy to use too 🙂 Roll out some fondant and secure the stencil down by going over it a couple of times with a rolling pin. Paint, lustre, airbrush your stencil with your chosen colour and then slowly peel back your stencil to reveal the map.
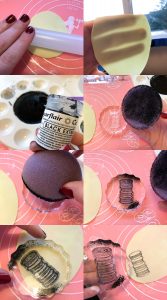
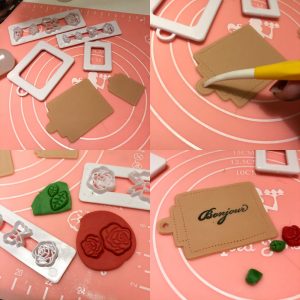 Next up we have our luggage tag cutters set. As well as having 2 sizes of tags, they also come with 2 strips of embossing/cutters! Tint some white fondant with chestnut sugarflair colours and roll it out to about 2mm thickness then cut out the tags. Just for an extra bit of detail, I ran a stitching tool around the edge of the tag but feel free to leave it as it is. Poke a little hole at the end of the tag using a scriber tool, cocktail stick etc. Roll out some coloured fondant and cut out some roses, petals or bows for extra decoration – alternatively, you can press them straight into the tag to emboss it.
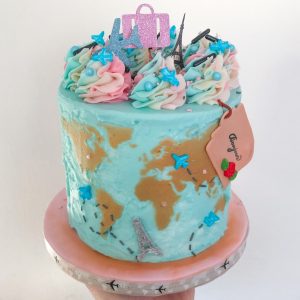
 Above is a tutorial to show you exactly how to replicate the cake below 🙂
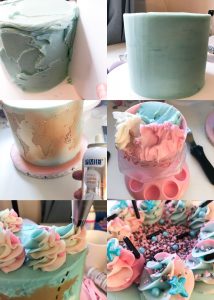
- Tint some buttercream using sky blue sugarflair, cover your cake and scrape off the excess using a tall scraper.
- Place the world map stencil over your cake and spray with some rose gold lustre spray *The rough textured buttercream was actually an accident – I was too impatient and placed the stencil straight onto the fresh coat! If you want a smoother finish, pop your cake into the fridge for about 30 minutes, it should be crusted over and not be sticky to the touch.
- Fit a piping bag with a 2D tip and fill your bag with pink, blue and white/uncoloured buttercream for beautiful multicoloured swirls. Pipe these around the top of the cake and top with sprinkles before it’s crusted over.
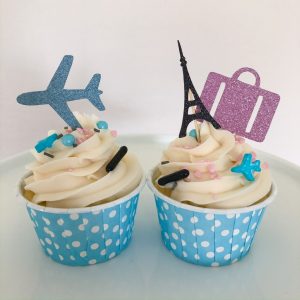
- For the plane trail, I pressed some of the planes from the sprinkle mix into the cake and then picked out the strands and carefully placed them onto the cake using tweezers (I enjoy testing my patience, clearly!).
- I used the leftover glitter toppers, an Eiffel tower topper and the baggage tag to complete the look!
 As you can see, there’s lots that can be done with this box – the design possibilities are endless! If you do make any goodies using one of our sub boxes and share them on social media, please hashtag #icedjemscakeclub so that we can see what you get up to 🙂
Jem x